February/March Projects

Improve blockIt’s tax season for me at work, but I have still been able to crank out a few projects, so I thought I would share. On February 10th, Linda Hungerford of Flourishing Palms blog and I gave our Modern Quilting presentation for the Tree City Quilt Guild in Gainesville, Florida. There were around 50 in attendance and I think everyone enjoyed it. Linda and I make a good team. I provide all the technology and she provides fantastic quilts, knowledge and experience.

Linda and I are working on some improv blocks for a workshop we are giving in June. Here is mine made with green scraps. It is inspired by a quilt in the book by Amanda Jean Nyberg, Sunday Morning Quilts. The quilt is called “The Missing U.”

Hexie Block January 2014I finished up another block for the Get Your Hex On! bee that I am a member of. These hexies were 1-1/4″ and I must say, I prefer the larger hexies to the smaller ones. I am working on 3/4″ hexies now and while I didn’t think I could work that small, they are looking pretty good.

The Gainesville Modern Quilters are getting organized to be a member of the The Modern Quilt Guild (the national Mug RugMug Rug Vanessaorganization). I am thrilled that we are finally taking that step. We elected officers at our March meeting and also did a mug rug swap. Mine is the one with the diamonds. The mug rug I got in the swap was made by Vanessa Wilson of Crafty Gemini. I love the quilting on it!

Butterfly Pillow

Baby GiftLastly, I got a few gifts whipped out. My mom’s birthday was March 5th and she had been wanting a butterfly pillow to go with her new recliner. The fabric is by Marcia Derse and the pattern came from Sew4Home blog.

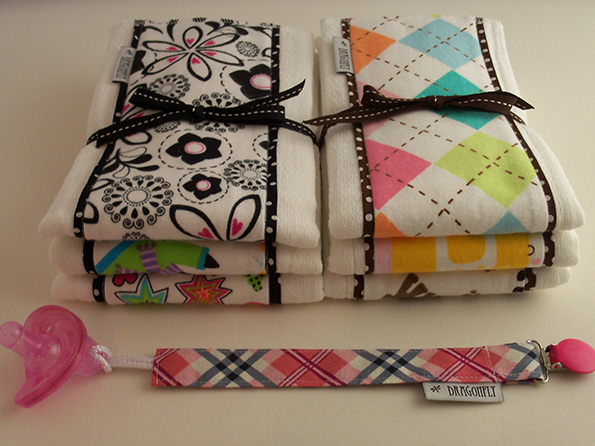
I also was invited to a baby shower for my niece, but was unable to attend due to work, but I got her a gift card from Babies ‘R Us and made these cute burp cloths and paci clip.

I am working on a pattern for the piped binding by machine technique that everyone has been asking about. I hope to have it out in the next month.

Happy Sewing! Lora

Hexies and More

Tags

, ,

Wow! Life gets in the way sometimes. I can’t believe it has been months since I have done a post. Since the last time I posted, work continued to be hectic with understaffing. That improved in January when we hired a great gal, Lisa to help with our “Virtual Back Office” work and she also sews! Actually, I met her through my Bernina dealer. My mom fell and broke her hip in September, leaving me to deal with the details. Those of you with aging, disabled parents know what I mean. She is now living at an assisted living facility at North Central Florida Retirement Village. She is well cared for and much better mentally and physically with all the activities and interactions they provide.

September BlockOctober BlockDuring all that time, I had little time to sew and actually lost my mojo. It happens from time to time. I did manage to get the September block done for my Get You Hex On! online quilting bee.  With the October bee we started getting Christmas fabric and I managed to knock out a couple of hexie snowflakes. I am still working on November, December and January’s blocks, but hope to finish soon as I have the February block and I just got everything mailed to my bee mates yesterday. So while everyone is working on my blocks, I can get caught up with theirs. February is the final month of our bee, so I can’t wait to get my blocks back!

IMG_0687So what did I choose for my month? I have been saving fat quarters from the Alison Glass’ collection called “Lucky Penny” by Andover Fabrics. I bought it last year at Quilt Con in Austin. I saw this pillow in the Andover booth and loved the fabrics.

I decided to make table runners and I divided the fabrics into a green/gold colorway and a red/gray color way. I pre-cut all of the hexies with my die cut machine and packed up 10 packages of 18 hexy fabrics and 18 hexy 1 1/2 inch papers. I have asked my bee mates to make two diamond shapes. I will put these all together to make two table runners. I may incorporate some linen (like in the pillow) when I start putting the blocks together. The process is very organic, I will have wait and see how I feel when the blocks return. Both colorways are pictured below. For my bee mates, I have mailed out instructions with the fabrics and papers, but if you want a sneek peak, you can find the instructions here.

green design wallred design wallsmall green colorway small red colorway

Summer Wrap Up

Tags

,

Wow, I can’t believe summer is over! My summer started with a very valuable employee leaving, which put me in a world of hurt as far as work goes. Consequently, my sewing and quilting world has come to a dramatic slow down. With no sewing, there isn’t much for me to blog about. I do miss both sewing and blogging.

I thought I would do a short post on the small little projects I have been doing for the “Get Your Hex On!” bee that I am participating in.

Get Your Hex On - AprilFirst was the April block, which was a segment from the “Flower Ball Quilt” designed by Geta Grama.

Hexie Sewing Machine


In May, 40 black hexies formed a sewing machine motive. Black fabric and black thread is difficult to work with, isn’t it?

HexiesThe June hexies will become part of the June Queen Bee’s table runner.

100_2608

The July block used elongated pentagons for a portion of a wall hanging.

August_2013(1)


August was an easy month, with 2 star blossoms.

August_2013(2)

I just received my fabrics for September, which is a large hexie flowerette, with two rounds.

Sexy Hexy

I have gotten much better with sewing the hexies together, moving from a whip stitch to a ladder stitch, which doesn’t show at all. I even experimented with a block for my month, which is February, 2014, playing around with some trapezoids and hexies for a take on Amy Butler’s “Sexy Hexy” quilt. My third round is larger than the round in Amy’s pattern. I haven’t decided on this yet, but I thought a bunch of these would make a cool table runner, but I am not sure. What do you think?

Piped Binding with Sewn Mitered Corners

Tags

, ,

Piped BindingWell, this post was supposed to be a tutorial. I did a demo of my piped binding technique at the Jacksonville Modern Quilt Guild meeting yesterday. I promised the ladies that I would post a tutorial with step by step photos. This morning I was unpacking all my stuff from the meeting yesterday and apparently I left my bag with all my necessary tools at the shop where we had our meeting. I had a quilt I wanted to bind today and I was going to take pictures of every step for the tutorial. I wasn’t sure if I would be able to do it without my tools. The two most important tools are my #10 edge stitch foot and #32 pin tuck foot. The #10 foot made it home with my sewing machine, but the #32 foot was in the bag with all my tools. Fortunately, I had purchased up a #31 pin tuck foot at my Bernina dealer yesterday so that I could use larger cording. Since I had the required feet, I decided to give it a go and substituted other tools that worked out very well. I worked all day on the quilt in the photo, between various household chores, taking pictures every step of the way. I sat down just now to review the pictures and get them organized for the tutorial and much to my surprise, the SD card was full and none of the pictures I took were captured. I am so sorry ladies.

Faux Piped BindingI promise I will finish up the Quilt for Boston and take pictures of the binding process. It is my next project in the que. The binding is already done and uses a faux piping, but the technique is basically the same.

Check back in a week. I still have all the quilting to do!

New Inspiration

Tags

, , ,

Like I don’t have a million projects already, I picked up another one at the Gainesville Modern Quilt Guild meeting Wednesday night!

IMG_0916For a recap of the meeting, here is Mia’s second quilt top. What a great job she did, it looks like plaid. IMG_0917Brigit shared a few of her small quilts. Her style is very modern, I just love it. Other projects were shared, but I didn’t get pictures of all of them. IMG_0918I’m sure they will all be posted on the guild’s website. We did a UFO swap and the idea is to finish the UFO (UnFinished Object) and then we will donate the quilts to a children’s charity. We are participating in Swim, Bike, Quilt’s annual 100 Quilts for Kids charity quilt drive.

Gina's Block 3I came home with two LARGE kaleidoscope blocks and a piece of a strip set from Gina. Gina has a terrific color sense and I was happy to get her blocks. She uses a lot of Kaffe Fassett fabrics and I have my own personal stash of Kaffe Fassett fabrics so I knew I had what a needed on hand to finish this project.  Gina said “I’m so happy you got my blocks because you are so precise and accurate and I am not.” I’m sure she can’t wait to see what I do with her blocks. Even though some say there are no rules in modern quilting, I beg to differ. Since I machine quilt my quilts, they need to be flat to avoid puckers (Gina hand quilts her quilts). In order for that to happen, the components must be pressed and pieced accurately. Gina's BlockI hope she is not offended, but first thing I did was take Gina’s wedges apart and pressed the seams open and eliminated all seams where the block came to a point to reduce bulk. I did this by drafting a Broken Spider Web Block in EQ7 (Electric Quilt) then printing on freezer paper. I ironed the freezer paper to the wedges and cut out accurate wedges. Next I cut out my star pieces with the freezer paper templates I drafted in EQ7. IMG_0919Then I pulled out lots of strips and pieced strip sets. Here is a picture of my cutting table. I cut out the remaining pieces and here is the result on the design wall. IMG_0920It contains fabrics from Kaffe Fassett, Amy Butler, Denyse Schmidt and several other designers for Michael Miller. The star pieces are linen. I used white at first, but the linen fabric looked so much better. What a great quilt! I don’t want to give it away, I love it! Now I need to make one for myself. I have until September to finish it, but since I was so inspired I couldn’t stop working on it. I love when that happens, don’t you? That is what the guild meetings are all about-inspiring and learning from each other!

WIP Wednesday

Tags

, ,

I just wanted to share what I am working on. I am bad about waiting until I finish a project to share it. So here is my Quilt for Boston quilt that I just layered and started quilting. It has lots of negative space and I am quilting in a zigzag every 3/8″. I’m not sure how long it will take to finish this, but I suspect a while. It is very different from what I usually make. I sort of made it up as I went along. Q for B

ChurnDash VariationOver the weekend I designed a paper piecing block for this churn dash variation. It is basically a churn dash block on point. I have four blocks sewn together in the picture at the right. There are some weird “house shape” pieces and piecing the regular way was very time consuming and not very accurate. I am using the freezer paper technique where you don’t sew through the paper. I like this technique much better than tearing out the paper. I am super pleased with how it turned out. What do you think?

I’m linking up with Freshly Pieced, check out the other WIP Wednesday posts and make comments please!

Got a Gainesville Modern Quilt Guild meeting tonight, more later! Lora

Where does the time go?

Tags

IMG_0881Wow! I can’t believe June is about over. Where did May and June go? May started out with the Tree City Quilter’s Bi-Annual Quilt Show. I had entered my quilt “Winter Palace” after a call from the Gainesville Modern Quilters to enter some modern quilts in the show. My quilt was one of three modern quilts in the show and to my surprise, it won second place in the category “Medium Pieced Duet.” Joan Gamble was the long-arm machine quilter and she won a ribbon too!. This quilt is one I designed for The Modern Quilt Guild Robert Kaufman challenge in 2012.IMAG0350

In other quilty events, Linda Hungerford from the Central Florida Modern Quilt Guild and I, representing the Gainesville Modern Quilters, jointly presented a program on modern quilting to the Country Road Quilters in Ocala, Florida in May. We IMAG0352shared a PowerPoint presentation and quilter’s resource list that we developed via email and also shared our modern quilts. Here is Linda talking about her Supernova quilt. We did the same presentation for the Bradenton chapter of The Quilt Guild of the Villages in The Villages, Florida in June. There was a great turnout at both events.

Here is a picture of me sharing my Bento Box quilt.

Bento Box100_2463

One quilt that I shared was a recent finish. Even though I originally made this quilt in 2008, I just finished the binding. It is made with Amy Butler’s Belle fabric line. Since Amy just re-released this fabric, it seems like a brand new quilt.100_2462

Also finished, in time for the modern quilting presentation, was “Baby Shoofly II.” Both quilts shown here (Baby Shoofly II and Simple Squared) were complete with the machine applied piped binding technique popularized by Ricky Tims in his video, Grand Finale.100_2451

On May 18th and June 15th was the Jacksonville Modern Quilt Guild Meeting at Lynn and Bob Provencher’s shop, Country Crossroads Quilt Shop in Orange Park, FL. We are growing slowly and we always have lots of fun. We have a new blog with lots of things going on, check it out here.

Over the 4th of July weekend I plan to work on my studio. I tore it up Memorial Day weekend, working on my die-cutting corner. It is an absolute wreck and very difficult to work in. I hope to have some great pictures of that project soon.

Have a wonderful weekend! I will be at another sew-in of the Jacksonville Modern Quilt Guild’s Quilts for Boston project on Saturday. Come join us if you are in the area.

Quilts for Boston

Tags

, ,

The Jacksonville Modern Quilt Guild has volunteered to assist the Boston Modern Quilt Guild with the comfort quilt project for the victims of the Boston Marathon bombing. The BMQG has received blocks from all over the world for this project. Yvonne, a member of both guilds (Jacksonville and Boston) brought back 80 blocks and she has been coordinating the effort to make several lap size (50″ x 60″) quilts. I started out with six blocks, then three blocks, then two blocks and one of my one.

Lone Starburst BlockI made this paper-pieced block from the free pattern on Craftsy from Anna Politzer of Six White Horses Studio, called Lone Starburst. I must say I got the idea from Yvonne’s blog post on the blocks she was making to send to Boston. This was one of the blocks she made recently and I really admired it. While I used the wrong paper for piecing the block and didn’t use a small enough stitch length, it turned out pretty good in spite of all my problems. I really haven’t done a lot of paper piecing and it took me about three tries before I got the hang of it. I’m not sure I am in love with this technique, but I sure do love the accuracy.

Here is what I have so far, check back for the finished top and finished quilt. I thought about the fact that there might not be a lot of “guy” quilts, so I hope this one will be more on the masculine side.

Quilt for Boston

For more info on this project, check out the Jacksonville Modern Quilt Guild’s blog. If you are in the area, please join us for a meeting or one of the scheduled sew-in dates.

More on what I have been up to for the last two months in my next post.

I’m linking up with Lee over at Freshly Pieced for WIP Wednesday.  Please check out the other blogger’s works in progress and leave comments. Everyone loves comments.

Just Passing Through

Tags

, ,

Just Passing Through 1I finally finished the back to Baby Shoofly #2. This quilt back is an improvisational pieced back adapted from a design by Weeks Ringle and Bill Kerr called Just Passing Through, published in the #4 issue of Modern Quilts Illustrated. The piecing in this quilt intrigued me, so I thought I would give it a try. I started out thinking that this would be very laborious with the 1/2″ finished strips of fabric, however,  I was surprised to find that the improvisational blocks were very addictive, I could not stop making them. I love the instructions in Modern Quilts Illustrated. Bill does a great job with graphics that tell the whole story of how to make the quilt, not a lot of written instructions. I am very visual, so this works for me. I’m not really one to read directions, I just dive right in. I cut all the strips with my 1″ strip die from Sizzix. It was a quick, easy and accurate process. After purchasing the magenta fabric I pondered the thought of the color bleeding on to the white quilt 1 in stripstop. I washed the fabric with a Shout Color Catcher and the color catcher came out pink. I next washed with another Shout Color Catcher and some older white/off white dish towels. The color catcher came out pink again, but the towels were not fazed. How do they do that?

Just Passing Through 2My Bernina 830 is fixed (needed a new pressure foot sensor) so I am headed up to Jacksonville (FL) today to retrieve her from Paula’s Fine Fabrics, my Bernina dealer. I hope to play more with some PaintWorks designs when I get her back so I can make a label for a quilt I am entering into a show in Gainesville (FL). I have two weeks to get it ready.

I’m linking up with AmandaJean’s Finish It Up Friday blog post over at Crazy Mom Quilts. Please check out the other finishes that other bloggers have posted.

Get Your Hex On!!

Tags

, , ,

Get Your Hex On - AprilI recently joined an online quilting bee, Get Your Hex On!! This bee is all about working with English Paper Piecing (EPP) hexagon shapes. I haven’t done English Paper Piecing for a time, so there was a little learning curve getting back into the process.  The first month was this short of wonky flower shape. I received my packet in the mail from the April bee leader with pattern shapes, instructions and fabric. The April leader is making a wall-hanging with the pattern by Geta Grama, Flower Ball.  All Geta’s patterns are on sale today for $5. You might want to check out her blog.  I am proud to have this finished and get it home to our April leader next week. I don’t have to worry about my project until later, as my month is February 2014, but I’m already thinking about it. Even though it is a small finish, I’m linking up with AmandaJean over at Crazy Mom Quilts for Finish It Up Friday.

bunnyLast Saturday I attended a demo/class at my Bernina dealer’s shop. It was on the relatively new Bernina software and tools, DesignWorks. This product works with Bernina embroidery systems and includes CutWork, PaintWork and CrystalWork. Cutwork is the original module and I purchased this when it came out. I mainly use this in conjunction with my die cutting systems so I can digitize the embroidery for the applique shapes cut with my dies.  Not exactly what it was intended for, but it really works great. I purchased the PaintWork module probably last November, but had never gotten around to playing with it. After the class last dragonfliesSaturday, I was anxious to get home and start playing. This module uses fabric markers to “paint” the design. It is kind of like embroidering, but without the needle and thread. Here are some designs I played around with. The Bunny Sketch is from an Urban Threads embroidery design that I converted to a PaintWork design. The dragonflies come from the Little Japan font that I purchased from Fonts.com for Dragonfly Quiltworks. I am still experimenting with different markers, however during my playtime my Bernina 830 got a error message and told me to take her into the dealer. Bummer! I think the PaintWork tool will be great for painting on clothing, placemats and napkins.  The CrystalWork tool looks pretty cool, but I’m not sure how much I would use it. My granddaughters would probably love a little “bling”. We’ll just have to see about that later.

Have a great weekend everyone and try something new!